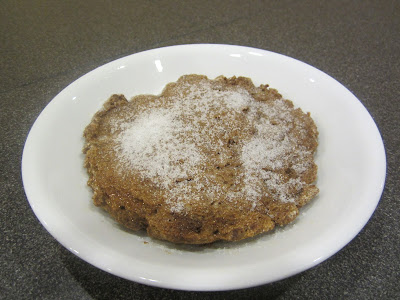
Chicken Breast Chips


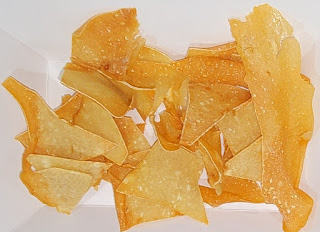
Chicken breast chips are a high-protein, low-fat, and a no-carb alternative to corn chips or potato chips. It’s all in the rolling, if you make them thick, they will be sturdy and have the crunch of a corn chip. If you make them thin, they become crispy like a potato chip. Either way they are delicious plain or can be seasoned with anything you like.

Chicken Breast Chips

Chicken chips satisfy that savory snacky feeling with satiating protein. The entire recipe boasts: 22.5 grams of protein, 2.6 grams of fat, and 0 carbohydrates for 120 calories. 

This recipe is all over the internet but I think the idea and the first to post chicken chips was cozypie https://youtu.be/7c6O-ZwmlYE.


INGREDIENTS

100 grams Boneless skinless chicken breast

Seasoning (optional)


DIRECTIONS

If starting from frozen, let the chicken thaw until you are able to cut it. After trimming any fat, cut into ½-inch to 1-inch chunks. I actually think it’s easier to cut chicken when it is half way frozen, so if I am starting from fresh, I throw it in the freezer just until it’s firm and easy to cut.

Place the chicken chunks into a food processor, blender, or meat grinder. I actually used an immersion blender and it worked really well but hubby thought it would eventually burn it out and he suggests a meat grinder. My little mini-no-name food processor did a great job with this recipe.

Puree the chicken to a smooth paste. Raw chicken paste doesn’t sound very appetizing but just wait, it will amaze you.

Place the chicken paste in a mound on a silpat baking mat. Place a piece of plastic wrap as big as the mat on top of the chicken paste. Smooth out the plastic wrap while patting down the paste into a uniform shape and thickness. Using a rolling pin, roll on top of the plastic wrap until the dough is thin (for corn chips) or very thin (for potato chips). How thick to roll the paste is a trial and error kind of thing, with repeated attempts the desired thickness will be mastered. Don’t be worried about thinner spots or even small holes when rolling out, these are handmade artisanal chips! If desired, sprinkle the chips with seasoning.

Lift the silpat baking mat and place it in a baking pan. Put the pan in a preheated to 300°F oven.   Bake for about 15 minutes or until the chicken paste looks set and has lost its wet shiny appearance.

Leave the oven on, but remove the baking pan. Carefully peel the sheet of chicken paste off the mat. Place the chicken paste sheet face up onto a cutting board. Using a pizza cutter, cut the chicken paste sheet into the size and shape of chips you would like.

Place the chips face down on the silpat covered baking pan and place in the oven for about 15 more minutes. If you rolled your chicken paste thick you may need to add 5 to 10 more minutes to your baking time. If you rolled your chicken paste thin you may need to watch them closely during the 15 minute baking time. If you don’t want to precut your chips, bake the chicken paste for a total of 30-40 minutes, let cool on the silpat mat, and then break into chips.

Eat while hot and crispy. Store the chips in an airtight container in the refrigerator (as you would any baked chicken product).


Notes:

·        100 grams of raw chicken breast covers the inside of a 16.5" x 11.6" silpat baking mat with a nice thin layer of chicken paste.

·        I used a $5 Wal-Mart knock off silpat baking mat and it worked just fine.

·        Using parchment paper instead of a baking mat made it harder to peel the chicken paste sheet off.

·        I just freeze these chips after the baking process. In an airtight container they are shelf stable.


In case you are wondering I don't think these taste like I am eating dried out chicken breast. Also I

find the texture and mouth feel is like a chip.


Soft Serve "Ice Cream"

Sometimes I just need some yummy and creamy chocolate. This is filling and every mouthful is satisfying. Once there are frozen banana slices in the freezer, this two ingredient soft serve takes less than 5 minutes to make.

Chocolate Soft Serve made with frozen bananas and unsweetened cocoa powder

When my bananas are going south, I slice them up and throw them into zip top sandwich bags. I weigh 120 grams of banana slices for each bag. This is just to make figuring my nutritional count easier. It really doesn't matter how much banana is used in this recipe, so no need to weigh. I slice the bananas up, bag them, and throw the bags into the freezer. Actually, I don't throw them into the freezer, I HIDE them in the freezer. The hubby is grossed out by bags of frozen bananas.

This is perfect for overripe bananas. The older the banana, the sweeter the soft serve will be

Waa Ha Ha! I found a zip bag of banana slices that the hubby missed.
Although caked with ice crystals These banana slices will work just fine.

One word of caution: My 25 year old Cuisinart never complains at puréeing rock hard fruit but all food processors are not created equal. I have a friend who seized the motor of her name brand food processor under the strain of frozen bananas. Once I tried this in a bullet blender. I only tried it the one time because it broke the bullet blender.

However, I bought a small Proctor Silex brand food chopper in the grocery store for $9 and it works perfectly if just a little bit slower than my Cuisinart.


Throw the frozen banana slices into the machine. If desired after it has run for just a minute, add a tablespoon of unsweetened cocoa powder.


There is a temptation to think: "This isn't working". Relax, be patient, it's worth the wait.


The machine might need to be turned off a couple of times to push and pack the bananas down so that the blade can whip them.


When everything is looking creamy and there are just one or two banana chunks rolling around get really excited, it is almost ready for a spoon.


Let the machine keep running until the bananas and cocoa are a smooth creamy consistency. Once there are no chunks it is ready to eat. It can also be frozen a bit in a small airtight container.


I like it fresh out of the machine. It is cold, creamy, yummy, and sweet.

Nutritional Information
120 grams of banana slices and 1 tablespoon of unsweetened cocoa powder:
Calories 120. Fat 1g, Carbohydrates 30g, Fiber 5g, Protein 2g.

This is creamy and there isn't a really strong banana taste. This really takes care of my chocolate fix.

DIY Yogurt (kinda)

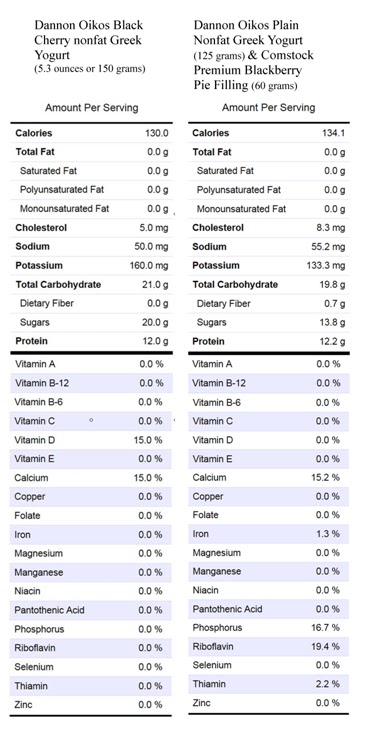
I have been buying the 5.3 ounce Dannon Oikos yogurts. I eat one nearly every day for breakfast. They are a little pricy though. I started thinking, I love the fat free and the fruit at the bottom I wonder if I make this a little cheaper.

I bought a 32oz container of plain nonfat Dannin Oikos yogurt and a 21 ounce can of  pie filling (no high fructose corn syrup or artificial sugars).

I figured out the ratio I needed which ended up being (by weight) 125 grams of the yogurt and 60 grams of the pie filling. It ended up being a great ratio so much so that I forgot to take a picture of it.

Now the important part, below is the comparison


The Whole Chicken Soup

This is HEAVENLY comfort in a bowl. We tried this recipe with boneless-skinless chicken breasts and it definitely lost something in the translation. After that blah-dom we went back to using a whole skinned chicken. MMM - back to the yummy.


The Whole Chicken Soup
Ingredients
Whole Chicken (about 4 pounds)
1 large onion, peeled and quartered
2lbs carrots (divided)
1 bunch celery (divided)
12 black peppercorns
¼ cup Better Than Bouillon chicken base
8 ounces Barilla Farfalle
Instructions
Remove the chicken skin and innards. Place the chicken in a LARGE stockpot. Fill with at least 1 gallon of water. Bring to a boil over high heat then reduce the heat. Cover and simmer for about 30 minutes.
 
While the chicken is simmering, wash the celery and peel the carrots. Rough cut about 1lb of the carrots and half of the celery. Peel and quarter the onion.
When the 30 minutes of simmering are up, add the rough cut pound of carrots, half of the celery and all of the onion. Add the peppercorns. Cover the pot and simmer for one hour.

Use that hour to chop the remaining celery into small pieces and cut the remaining carrots into coins. Prepare a large strainer over a GREAT BIG bowl (or container large enough to receive the liquid chicken stock. DO NOT make the mistake I did once. I picked a medium sized bowl and had a big weepy boo-hoo as I watched half of my lovely stock goes down the drain.

When
 the hour of simmering is complete, strain the chicken stock. Reserve the chicken in the strainer and set aside to cool. Discard the cooked celery, carrots, onions and peppercorns that were used to flavor the chicken stock.

Pour the strained stock into a gallon drink container with a bottom spigot. Let the stock set so that the oil will rise to the top (about 5 minutes). When the oil has separated from the stock, position the spigot over your empty stockpot. Open the spigot and let the broth drain into the pot being careful to turn off the spigot before the oil is drained. Discard the oil.


Place the stockpot on high heat, add the chicken base and mix well. After the broth and base have combined, add the chopped celery and carrot coins. Bring the broth mixture and veggies to a boil then reduce the heat and cover. Simmer for 15-20 minutes or until the carrots are tender.

While the chicken stock, celery and carrots are simmering, remove any remaining the skin and bone from the chicken and cut the meat into bite size chunks. The chicken will be so tender it will fall of the bone and can be cut up easily.When the carrots are tender, add the chicken and noodles. Heat for about 10 minutes or until the noodles are cooked to your preference.

1 Serving is 1/12th of the recipe (about 1.5 cups of soup)

Nutrition Per Serving:
Calories 171.8, Fat 3g, Carbs 16.8g, Fiber 1.9g, Protein 19.4g and 4 Points Plus


Individual Microwave Crustless Pumpkin Pie


It's the middle of October and I am ready for something warm and delicious. This is a great filling breakfast but it could be a great dessert anytime.


Ingredients:

1/2 cup canned pumpkin
            (not pie mix but 100% pure pumpkin)*
3 teaspoon pumpkin pie spice
1 egg white
1 tablespoon sugar
 
*When I open a big can, I measure out 1/2 cups of pumpkin into small freezer bags. When I want to use the pumpkin I either put in the refrigerator to thaw or use the microwave to defrost it.

Instructions:
 
Combine the pumpkin and the pumpkin pie spice and stir until well mixed.

In a tall skinny container (a disposable 32-ounce deli container works well for me) using one whisk in a hand blender, beat the egg white until stiff and it forms peaks.

With a spatula scrape the edges of the bowl containing the pumpkin mixture.

Dump all of the fluffed egg whites into the pumpkin mixture and gently fold until all is combined but the egg white still remains fluffy with air.


If you want it to look pretty spoon it into another bowl and smooth it.

Microwave for 2 minutes on high (my microwave is 1250 watts, you might have to alter the cooking time based on your microwave's wattage).

Sprinkle with sugar and let cool for a minute.
 
The hardest part of this recipe is waiting for it to cool enough to eat. Eat while still warm.

Nutrition Information
Entire recipe: Calories 105.8. Fat 0.5g, Carbohydrates 21.6g, Fiber 5g (Oh Ya Baby), Protein 6g and PointsPlus 3

Using artificial sweetner instead of sugar would reduce the amount of calories, carbs and PointsPlus.


Enchilada Sauce

Guilt free and seriously a delicious choice!
Chicken Enchilada Soup option shown

This recipe uses canned Enchilada Sauce and kicks it up a notch with a the yumminess of pumpkin.

Ingredients:
¼ cup water
½ cup celery, diced small
1 clove garlic, diced small
½ onion, diced small
½ green bell pepper, diced small
1½ cups canned 100% pure pumpkin puree (not pumpkin pie mix)
1 can (4 ounces)diced green chilies (do not drain)
1 can (20 ounces) Rosarita Red Enchilada Sauce
1 Tablespoon Ground Chipotle Chili Pepper

Instructions:
Place the water, celery, garlic, onion and bell pepper in a large stockpot on medium-high.

Cook, stirring occasionally until the vegetables are tender and reduced and the water is gone.

Add the pumpkin puree, green chilies and enchilada sauce. Stir occasionally until all is heated through. Add the chili pepper to taste.


This is a great way to get fiber and veggies. There is not a hint of pumpkin in the way it looks, tastes or smells. The texture is a thick sauce.


This recipe makes 9 - ½ cup servings.


Each ½ cup sauce = 1 PointsPlus.


Option:

Enchilada Soup (Additional PointsPlus will apply):

For each ½ cup sauce add ½ cup fat-free chicken broth, one ounce of chicken (grilled boneless and skinless) and ¼ cup of frozen corn. Top with shredded cheese and tortilla strips if desired.

This sauce also freezes well.

Asian Lettuce Wraps

Our version of the yumminess from Pei Wei

Ingredients
1 lb minced chicken (raw or minced cooked chicken)
1 bunch green onions, thinly sliced
2 teaspoons minced garlic
2 cups shredded carrots
6 tablespoons Hoisin sauce
3 tablespoons soy sauce
2 teaspoons sesame oil
½ teaspoon hot chili paste (or hot and sweet chili paste)
1 small head green cabbage*
2 small heads iceberg lettuce

Instructions
Wash and finely shred cabbage.*
Wash and cut the iceberg lettuce to make the leaves resemble little bowls.
Pat dry and chill Heat a fry pan over medium-high heat.
Cook the chicken, green onions and garlic for 5 to 7 minutes, or until browned.
Add the shredded carrots, Hoisin sauce and soy sauce.
Stir frequently until thoroughly heated.
Remove from heat and stir in the sesame oil and chili paste.
Serve by spooning a thin layer of cabbage shreds into each lettuce leaf.
Top the cabbage with the minced chicken mixture.
Serve with sides of soy sauce, Hoisin sauce or chili sauce as desired.
Wrap the filling up in the lettuce leaf. Enjoy.

*Prepare white rice can be added to or substituted for the cabbage.

Makes 8 servings

Nutritional Information (without lettuce, cabbage or rice)

1 serving: 1/2 cup (92 grams): Calories 117.6, Fat 2.3g, Carbohydrates 9.3g, Fiber 1.3g, Protein 14.4g and PointsPlus 3