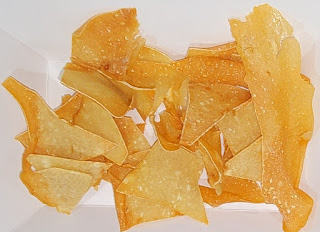
Chicken chips satisfy that savory snacky feeling with satiating protein. The entire recipe boasts: 22.5 grams of protein, 2.6 grams of fat, and 0 carbohydrates for 120 calories.
This recipe is all over the internet but I think the idea and the first to post chicken chips was cozypie https://youtu.be/7c6O-ZwmlYE.
INGREDIENTS
100 grams Boneless skinless chicken breast
Seasoning (optional)
DIRECTIONS
If starting from frozen, let the chicken thaw until you are able to cut it. After trimming any fat, cut into ½-inch to 1-inch chunks. I actually think it’s easier to cut chicken when it is half way frozen, so if I am starting from fresh, I throw it in the freezer just until it’s firm and easy to cut.
Place the chicken chunks into a food processor, blender, or meat grinder. I actually used an immersion blender and it worked really well but hubby thought it would eventually burn it out and he suggests a meat grinder. My little mini-no-name food processor did a great job with this recipe.
Puree the chicken to a smooth paste. Raw chicken paste doesn’t sound very appetizing but just wait, it will amaze you.
Place the chicken paste in a mound on a silpat baking mat. Place a piece of plastic wrap as big as the mat on top of the chicken paste. Smooth out the plastic wrap while patting down the paste into a uniform shape and thickness. Using a rolling pin, roll on top of the plastic wrap until the dough is thin (for corn chips) or very thin (for potato chips). How thick to roll the paste is a trial and error kind of thing, with repeated attempts the desired thickness will be mastered. Don’t be worried about thinner spots or even small holes when rolling out, these are handmade artisanal chips! If desired, sprinkle the chips with seasoning.
Lift the silpat baking mat and place it in a baking pan. Put the pan in a preheated to 300°F oven. Bake for about 15 minutes or until the chicken paste looks set and has lost its wet shiny appearance.
Leave the oven on, but remove the baking pan. Carefully peel the sheet of chicken paste off the mat. Place the chicken paste sheet face up onto a cutting board. Using a pizza cutter, cut the chicken paste sheet into the size and shape of chips you would like.
Place the chips face down on the silpat covered baking pan and place in the oven for about 15 more minutes. If you rolled your chicken paste thick you may need to add 5 to 10 more minutes to your baking time. If you rolled your chicken paste thin you may need to watch them closely during the 15 minute baking time. If you don’t want to precut your chips, bake the chicken paste for a total of 30-40 minutes, let cool on the silpat mat, and then break into chips.
Eat while hot and crispy. Store the chips in an airtight container in the refrigerator (as you would any baked chicken product).
Notes:
· 100 grams of raw chicken breast covers the inside of a 16.5" x 11.6" silpat baking mat with a nice thin layer of chicken paste.
· I used a $5 Wal-Mart knock off silpat baking mat and it worked just fine.
· Using parchment paper instead of a baking mat made it harder to peel the chicken paste sheet off.
· I just freeze these chips after the baking process. In an airtight container they are shelf stable.
In case you are wondering I don't think these taste like I am eating dried out chicken breast. Also I
find the texture and mouth feel is like a chip.


No comments:
Post a Comment